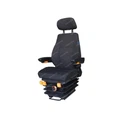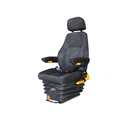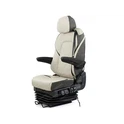


If you spend long hours behind the wheel, upgrading to a Truck Mechanical Suspension Seat is one of the smartest investments you can make. Designed to absorb road vibration and reduce driver fatigue, a quality mechanical suspension seat like the YSR 911-5B dramatically improves both comfort and safety on the job. This guide walks you through everything you need to know - from preparation and tools to step-by-step installation and post-install adjustments.
Before You Begin: Tools and Compatibility
Gather Your Tools
Having the right tools on hand makes the job cleaner and safer:
- Socket set, wrenches, screwdrivers, and pliers
- Torque wrench (essential for correct bolt tension)
- Drill and bits (only if new mounting holes are required)
- Safety glasses and gloves
- Medium-strength thread locker
- Anti-seize compound (recommended for trucks operating in harsh or corrosive environments)

Verify Compatibility
Before purchasing a mechanical suspension seat, confirm that it fits your cab and suits your driver profile.
- Dimensions: The YSR 911-5B measures 660×1100×542 mm - check that your cab can accommodate this.
- Mounting Pattern: Compare the new seat's base pattern to your existing floor mounts. YSR also offers customized mounting bases if your truck's pattern doesn't match standard configurations.
- Driver Weight Range: The seat's mechanical suspension system is calibrated for drivers weighing between 40 and 130 kg. Confirm your driver falls within this range for optimal performance.
Safety First
- Disconnect the truck battery before starting to avoid electrical shorts or accidental airbag deployment.
- Park on level ground with the parking brake engaged.
- Work in a well-lit, well-ventilated area.
- The YSR 911-5B weighs 35 kg net - use proper lifting techniques and ideally work with a partner.
Step-by-Step Installation
Step 1: Remove the Old Seat
Start by disconnecting any electrical connectors if the existing seat has powered adjustments or integrated sensors. Remove the four mounting bolts securing the seat to the cab floor, then carefully lift out the old seat. Once removed, inspect the floor area - clean away debris and check for rust or damage before proceeding.
Step 2: Prepare the Mounting Area
Clean the mounting surface thoroughly. Remove any old thread locker residue and inspect the bolt holes for damaged threads. If you're using a YSR custom base, position it over the floor mounts and dry-fit it to confirm alignment before committing to installation.
Step 3: Unpack and Inspect the New Seat
Unpack the mechanical suspension truck seat carefully and inspect it for any shipping damage. Verify that all adjustment mechanisms move freely. For easiest handling during installation, slide the seat fully forward and lower it to its minimum height position. Pre-assemble any custom bracket components at this stage.
Step 4: Position the Seat in the Cab
With a helper, lift the seat into the cab and align it over the mounting holes. Slide the seat on its rails if needed to access all four bolt positions. Double-check that the seat is facing forward correctly before proceeding.
Step 5: Secure the Mounting Bolts
Insert grade 8.8 or higher bolts (typically M10 or M12). Apply medium-strength thread locker to each bolt thread before insertion - this prevents bolts from loosening due to road vibration over time. Hand-tighten all bolts first to ensure they're not cross-threaded, then torque them to specification (typically 40–50 Nm for M10 bolts; consult YSR documentation for confirmed values). Re-check all bolts after torquing.
Step 6: No Electrical Connections Required
One of the key advantages of a mechanical suspension design is its energy independence. The YSR 911-5B requires no external power source, no air lines, and no hydraulic connections. This significantly simplifies installation compared to air-ride or powered alternatives - once the seat is bolted down, you're essentially done with the hard work.
|
|
|
|
|


Step 7: Test All Adjustments
Before closing up, verify that every function on the seat operates correctly:
- Horizontal slide: 200 mm stroke
- Height adjustment: ±60 mm range
- Weight/suspension tuning: 40–130 kg dial
- Backrest recline: 80° + 41° range
- Headrest: 75 mm, 3 positions
- Seat belt: Height-adjustable 3-point belt
Sit in the seat and bounce gently to confirm the mechanical suspension system responds correctly. The seat should absorb movement smoothly without bottoming out or feeling overly stiff.
Step 8: Final Safety Check
- Confirm all mounting bolts are fully torqued.
- Verify the seat has zero rocking or lateral movement.
- Check that all seat adjustments clear the steering wheel, pedals, and dashboard controls.
- Reconnect the truck battery.
Post-Installation: Getting the Most from Your Seat
Set the Weight Adjustment Correctly
This is one of the most commonly skipped steps - and one of the most important. The mechanical suspension on the YSR 911-5B must be tuned to the driver's weight for proper performance. Set the suspension dial to match the driver's weight before the first drive, then fine-tune as needed after a short test run.
Ergonomic Positioning
Take a few minutes to dial in your ergonomics:
- Height: Adjust for clear sightlines over the dashboard.
- Horizontal position: Move forward or back to comfortably reach the pedals with a slight knee bend.
- Backrest: Recline to a position that supports the lumbar curve naturally.
- Headrest: Position for light neck contact - not pressure.
Re-Torque After the First Week
It's good practice to re-check bolt torque after the first week of use, especially on trucks that operate on rough terrain. Vibration can cause initial settling in the mounting hardware, and a quick re-torque ensures everything stays secure.
Common Mistakes to Avoid
|
Mistake |
Risk |
Fix |
|
Under-torqued bolts |
Seat loosens over time |
Always use a torque wrench |
|
Skipping thread locker |
Bolts back out from vibration |
Apply before every bolt |
|
Ignoring weight adjustment |
Poor suspension response |
Set dial immediately after install |
|
Installing alone |
Injury risk, poor alignment |
Always use a helper |
|
Skipping the function test |
Hidden issues go undetected |
Test every adjustment before driving |

Conclusion
Installing a Truck Mechanical Suspension Seat is a straightforward process that pays dividends in driver comfort, reduced fatigue, and long-term health. By following the steps above - gathering the right tools, verifying compatibility, securing the seat correctly, and tuning the mechanical suspension system to the driver's weight - you can complete the upgrade in a single session with confidence.
For expert guidance, custom mounting solutions, or to order the YSR 911-5B directly from the factory:
Phone: +86-029-81136503
Email: sales@ysrseats.com
WhatsApp: +86-13991337062
WeChat: 18992819914
Related Articles
What is a truck mechanical suspension seat?
How does truck mechanical suspension seat and work?
What are the benefits of using a mechanical suspension seat in a truck?
Why do trucks use mechanical suspension seats?
Are Mechanical Suspension Seats Fully Adjustable?
What's the difference between mechanical suspension and air suspension seats in trucks?
Do mechanical suspension truck seats reduce driver fatigue and back pain?
How do I choose the right mechanical suspension seat for my truck?
Will a mechanical suspension seat fit my truck's cab or mounting rails?
How do I install a mechanical suspension seat in a truck?