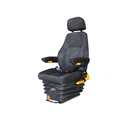
If you operate heavy machinery, drive long-haul trucks, or spend hours on a tractor, you know how punishing a rigid seat can be. Installing an Air Suspension Seat Base is a straightforward, rewarding upgrade that transforms your ride from jarring to comfortable, dramatically reducing fatigue and back strain. Whether you're looking at a tractor air suspension seat base for agricultural work or an air ride truck seat base for highway hauling, the installation process follows similar principles.
While mechanical aptitude helps, this project primarily requires basic tools and careful attention to detail. Quality products like the YSR-PJ003 are engineered for reliable performance and designed with installation ease in mind. This guide walks you through each step to ensure a safe, successful upgrade that will serve you for years to come.
Pre-Installation: Preparation and Compatibility Check
Before beginning, gather your essential tools and materials. You'll need a socket set, adjustable wrenches, a torque wrench for proper bolt tension, thread locker compound, and basic safety gear including gloves and safety glasses. Having a helper nearby can make positioning the seat base significantly easier.

Compatibility verification is critical. First, examine your existing seat cushion's mounting pattern-the bolt holes on its underside must align with the new air ride seat base's upper plate. Measure the hole spacing if specifications aren't readily available. Second, confirm that the base's lower mounting points match your vehicle's floor holes or existing slider rails. Third, check clearance: the air suspension base will add height, and you need adequate headroom plus space for the full adjustment range. For off-road equipment or agricultural vehicles, a tractor air suspension seat base typically accounts for these clearance needs, but verification prevents costly surprises.
Step-by-Step Installation Guide
Step 1: Preparation & Safety
Park your vehicle on level ground and engage the parking brake. If your seat has electrical components like heating or adjustment motors, disconnect the vehicle battery to prevent shorts. Clear the workspace around the seat, removing any floor mats or obstructions. This preparation phase sets the foundation for smooth work ahead.
Step 2: Removing the Old Seat Assembly
Locate all mounting bolts securing your current seat and base to the vehicle floor. These are typically four to six bolts accessed from below or through side covers. Carefully unbolt them, supporting the seat's weight as you remove the final fasteners. Lift the entire assembly out-having assistance here prevents injury and makes the job easier.
Once removed, thoroughly clean the vehicle's mounting surface. Remove rust, dirt, and old thread locker residue. A clean mounting surface ensures proper torque values and prevents future loosening.
Step 3: Installing the New Air Suspension Seat Base
Position your new air ride seat base onto the vehicle's mounting points, ensuring proper orientation-the adjustment controls should face the driver's position. The YSR-PJ003 features clearly marked mounting positions for fool-proof installation.
Thread in the mounting bolts by hand first to confirm alignment. Apply thread locker compound according to the manufacturer's instructions, then tighten bolts in a cross-pattern using your torque wrench. This pattern prevents warping and ensures even load distribution. Typical torque specifications range from 30-50 ft-lbs, but always consult your specific product documentation.

Step 4: Re-attaching Your Seat Cushion
With the air ride truck seat base secured, place your existing seat cushion onto the top mounting plate. Align the bolt holes carefully-forcing misaligned holes can strip threads or crack mounting tabs. Insert and hand-tighten all bolts before final torquing.
Again, use a cross-pattern tightening sequence and apply the specified torque. This step reunites your familiar seat comfort with the new suspension technology beneath it.
Step 5: System Check & Initial Adjustment
Reconnect the vehicle battery if you disconnected it earlier. Locate the air valve-typically positioned on the base's side for easy access. Using the included pump or valve tool, inflate the air spring to medium pressure as a starting point. Most systems indicate proper inflation through tactile feedback or basic pressure gauges.
Test all functions systematically: height adjustment should move smoothly through its range, fore/aft sliding should lock securely at any position, and the suspension should compress and rebound without harsh bottoming or excessive bounce. Sit in the seat and adjust air pressure to your weight and comfort preference-heavier operators need more pressure, while lighter users require less.
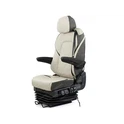
Understanding Your Upgrade: Key Components of the YSR-PJ003
Your newly installed system works through three integrated components. The air spring (airbag) provides the primary cushioning, with adjustable pressure allowing personalization for different operators or load conditions. The hydraulic damper works in tandem, controlling movement speed to prevent bouncing while maintaining responsive cushioning over rough terrain. Finally, the robust structural framework includes a composite support system and durable construction rated for demanding environments, whether you've installed a tractor air suspension seat base for fieldwork or an air ride truck seat base for highway use.

Enjoy Your Enhanced Comfort
You've successfully transformed your operator station from a rigid, jarring experience into an adjustable, vibration-damping comfort zone. Proper installation unlocks the full benefits of your new Air Suspension Seat Base-reduced fatigue, personalized comfort adjustment, and protection for your spine and joints during long working hours.
For questions about compatibility, technical drawings, or custom OEM/ODM solutions, YSR Seating's experts are ready to assist:
Email: sales@ysrseats.com
Phone/WhatsApp: +86-029-81136503 / +86-13991337062
WeChat: 18992819914