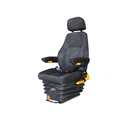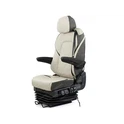
Seat Mechanism:
Height adjustable driver seats are designed to provide customizable comfort and support for drivers of various sizes and preferences. The mechanism behind these seats typically involves a series of interconnected components that work together to facilitate smooth vertical adjustments.

At the core of the height adjustment system is a set of parallel rails or tracks, often made of sturdy metal, that allow the seat to slide up and down. These rails are typically mounted to the vehicle's floor or a dedicated seat base. The actual seat is then connected to a sliding carriage or stage that moves along the rails, empowering the driver to raise or lower the seat depending on the situation.
The vertical adjustment is typically powered by either a manual lever or an electric motor.On account of a manual system, the driver works a switch or handle that enacts a stuff or pulley component, which thus moves the seat up or down. Electrically-controlled level change frameworks, then again, use a little electric engine that answers controls, like fastens or switches, situated inside the driver's compass.
To guarantee a steady and secure seating position, level movable seats frequently consolidate extra elements, like locking components or detents, that hold the seat set up at the ideal level. These safety measures prevent the seat from unexpectedly moving during driving, which could compromise the driver's control and stability.
Furthermore, some advanced height-adjustable seats may integrate additional adjustability, such as fore-aft positioning, backrest recline, and lumbar support. These features work in tandem with the height adjustment to provide a comprehensive ergonomic solution for the driver [1][2].
Identifying the Correct Seat Model:
While introducing a height adjustable driver seat, it is essential to choose a model that is viable with your particular vehicle. Variables to consider incorporate the make, model, and year of your vehicle, as well as the accessible mounting focuses and aspects of the seat well or base.
Many vehicle manufacturers offer height-adjustable seats as optional or standard equipment, and these seats are designed to seamlessly integrate with the vehicle's existing seat mounting system. In such cases, the installation process is typically straight forward, as the seat is engineered to fit the designated seat well.
However, if you are looking to install a third-party or aftermarket height-adjustable seat, it is essential to carefully research and verify the compatibility of the seat with your vehicle. Manufacturers of these aftermarket seats often provide detailed fitment guides, which can help you determine if the seat will properly align with your car's seat mounting points and provide the necessary range of adjustment.
It is also worth considering the specific features and specifications of the height-adjustable seat, such as the maximum and minimum seat height, the range of adjustment, and the weight capacity. Ensuring that the seat meets your needs and the requirements of your vehicle will help to ensure a successful and safe installation [3][4].
Safety Precautions Before Installation:
Before beginning the installation of a height adjustable driver seat, it is essential to take several safety precautions to protect both yourself and your vehicle.
First and foremost, ensure that the vehicle is parked on a level surface and the parking brake is engaged. This will prevent the vehicle from moving during the installation process, which could lead to injury or damage.
Next, disconnect the vehicle's battery to eliminate the risk of electrical shocks or shorts. This is particularly important when working with the electrical components of the height-adjustable seat, such as the control switches or wiring harness.
Carefully read through the manufacturer's installation instructions and familiarize yourself with the required tools and hardware. Ensure that you have all the necessary components and that they are in good condition before proceeding.
It is also recommended to wear appropriate personal protective equipment (PPE), such as safety glasses, gloves, and a dust mask, to minimize the risk of injury during the installation process. This is especially important when handling heavy or sharp objects, or when working in confined spaces.
Finally, make sure to clear the work area of any loose items or debris that could interfere with the installation or pose a tripping hazard. Maintaining a clean and organized workspace will help to ensure a safe and efficient installation [5][6].
Step-by-Step Installation Guide:
Installing a height adjustable driver seat typically involves a series of steps that should be followed carefully to ensure a successful and safe installation. Here is a detailed, step-by-step guide:
①Prepare the Vehicle: Begin by removing the existing driver's seat from the vehicle. Consult the manufacturer's instructions for the specific steps required, as the process may vary depending on the make and model of your car.
②Assess the Mounting Points: Carefully examine the vehicle's seat mounting points to ensure they are compatible with the new height adjustable seat. Measure the spacing and alignment of the existing mounting holes to verify that the new seat will fit properly.
③Prepare the Mounting Brackets: If the new height-adjustable seat does not come with pre-installed mounting brackets, you will need to attach them to the seat base. Follow the manufacturer's instructions carefully to ensure a secure and stable connection.
④Position the Seat: Carefully place the height adjustable driver seat into the vehicle, aligning the mounting brackets with the corresponding holes in the floor or seat base. Make sure the seat is centered and level.
⑤Secure the Seat: Using the provided hardware, such as bolts and washers, securely fasten the mounting brackets to the vehicle's seat mounting points. Tighten the fasteners according to the manufacturer's specifications.
⑥Connect the Electrical Components: If the height-adjustable seat features electric controls, locate the appropriate wiring harness and connect it to the vehicle's electrical system. Consult the installation guide for the proper connection points and routing of the wires to avoid interference or damage.
⑦Test the Functionality: Once the seat is physically installed, test the height adjustment mechanism to ensure it is working properly. Raise and lower the seat to the full range of motion to verify smooth and consistent operation.
⑧Adjust and Secure: Fine-tune the seat position and height to your preferred driving position. Ensure that all adjustment mechanisms are properly locked in place to prevent unintended movement during operation.
⑨Finalize the Installation: Tidy up any loose wires or cables, and double-check that all fasteners are securely tightened. Reinstall any trim or panels that were removed during the installation process.
⑩Perform a Final Inspection: Thoroughly inspect the installed height-adjustable seat, checking for any potential issues or concerns before taking the vehicle on the road.
To learn more about YSR seats, please contact us at sales@ysrseats.com.
References:
[1] "The Mechanics of Height-Adjustable Automotive Seats" - Journal of Ergonomics
[2] "Optimizing Seat Design for Driver Comfort and Control" - SAE International
[3] "Compatibility Guide for Aftermarket Automotive Seats" - SEMA
[4] "Selecting the Right Fit: Choosing a Height-Adjustable Seat for Your Vehicle" - Car and Driver
[5] "Safety Considerations for Automotive Seat Installation" - NHTSA
[6] "Best Practices for DIY Automotive Seat Replacement" - Popular Mechanics
[7] "Step-by-Step Guide to Installing a Height-Adjustable Driver Seat" - AutoZone
[8] "Comprehensive Installation Instructions for Height-Adjustable Seats" - Seat Manufacturer's Guide